Dogfish Wagon Kit
by Steven O’Mullen
You all know how it is. For some unfathomable reason, you’ll see a wagon/coach/locomotive and think “I really like that — I’ll have to try and get a model of it”. It may not be anything glamorous, it may not even
fit in the time period you model, but YOU like it, and YOU want one on your layout. So, don’t ask me why, but for some reason I really wanted some Dogfish wagons to run behind my Lima class 26 in “Dutch” livery.
As luck would have it, Cambrian Models do a cheap (£5.5O each)Dogfish wagon kit for this very wagon, so, instead of waiting for the Heljan ones, I ordered two Cambrian kits. This is how I got on, but please bear in mind I’m no expert on prototype Dogfish wagons, kit building, or, well, anything really, so go easy on me…
On receiving the kits, my first impressions were — “It looks pretty easy”. So, reassured, I sat down and got started.
I’m sure most of you know how kits work, so I’ll try not to bore you here…
After cutting the parts from the mould I began to make the basic wagon frame up. The instructions are pretty clear, so after joining the solebar to the headstock and adding the footplates I had a neat little frame for the hopper to sit in. Or so I thought. I tried inserting the wheels at this point and realised that the wagon is far too wide for them (well, it was for the wheels I was using bog-standard Hornby ones). I had to take the headstock and solebar apart and file them down to make the fit narrower, so the wheels would fit snugly between them. This took quite some time, but I got there eventually. Is this a fault with the kit, or with the wheelsets I wonder?
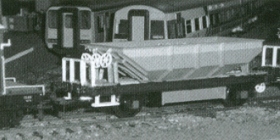
Dogfish wagon showing ballast loadI had been told by a friend to make sure the wagon sits flat, with all four wheels on the track. This is a good tip, as it’s easy to let the glue harden with the frame squint, which means of course, the wagon won’t sit right or run properly. Thankfully, my wagon frame was level, so – on with the hopper.
It was at this point that I felt like a certain yellow skinned, balding, stupid cartoon character, as I realised I had removed – what I thought was flash, hut now turned out to be hopper supports – from the solebars. Doh! Obviously, I didn’t do this with the second kit, and, to be honest, it’s not really that noticeable (the hopper actually sits on the frame better too).However, I pressed on, adding the hopper, and, underneath, the chute. Voila! One almost complete Dogfish wagon.
What’s next? Add this little cylinder here and.. Hang on! The instructions now tell you to add the cylinder, this means trying to manoeuvre it in under the hopper which is unnecessarily fiddly. Adding the cylinder BEFORE fitting the hopper makes life rather easier.
The hopper supports are next and are fairly easy to glue in position. Adding the handwheels is a little harder, especially when you can’t find any tweezers and have to use needle nose pliers!
So, after about two hours you have a nice little wagon, needing only couplings and some paint to finish it off. To couple the two wagons to each other I simply used bent paper clips and painted them black. Not ideal, but they’re pretty unobtrusive and work well enough. Painting was the simple yellow/grey of “Dutch” livery, although I’ve still to get transfers for the models.
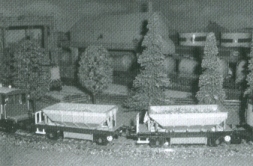
A pair of Dogfish wagonsThe insides of the hoppers do have some molded detail, but I decided to run my wagons with a ballast load. So, I poured in some 00 gauge ballast and soaked the lot with the usual PVA/ water/washing up liquid mix. This sets hard enough to stay in position and looks quite realistic — it also adds a little weight to the finished wagon.
Overall then, for around £12 I have two great little wagons to run, and I also have the satisfaction of being able to look at them with a smug look and say “I built them”. (Not too smug though, I know they’re not perfect — I didn’t even bother to add the side handrails that are a feature of the prototype!)
Highly recommended, for beginners and experts alike.
Cambrian Models can be found at www.cambrianmodels.co.uk, or at Cambrian Models, 37 South Undercliff, RYE, TN3I 7HN.
This article was first published in the Winter 2004 Double O Gauge Association Journal
All Material copyright the Double O Gauge Association 2004